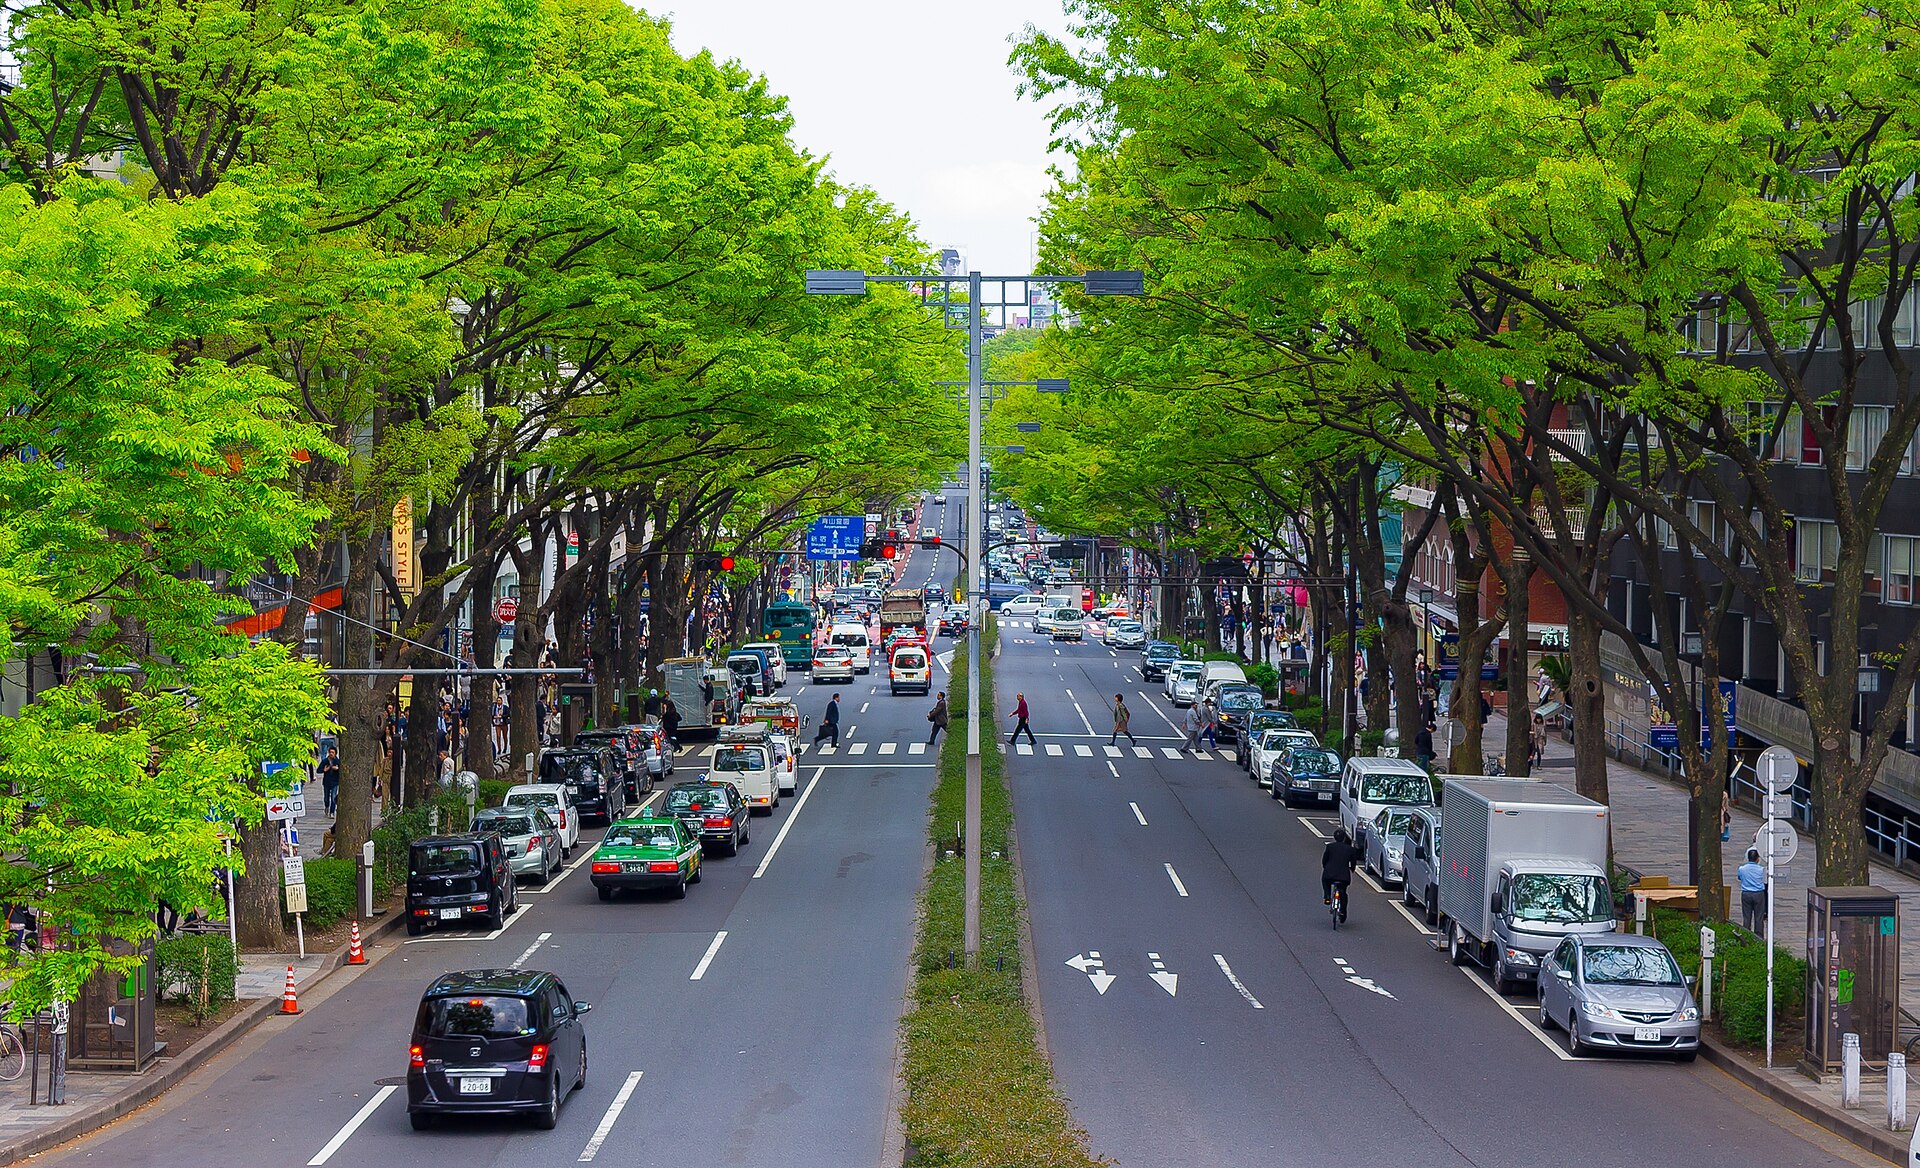
If you dropped a modern architecture museum onto a single street and forgot to charge admission, you’d get Omotesando. Within about 3.5 km, you can walk past work by Kengo Kuma, Tadao Ando, Herzog & de Meuron, SANAA, Toyo Ito, MVRDV, and Kenzo Tange — all of it viewable from the sidewalk, all of it free.
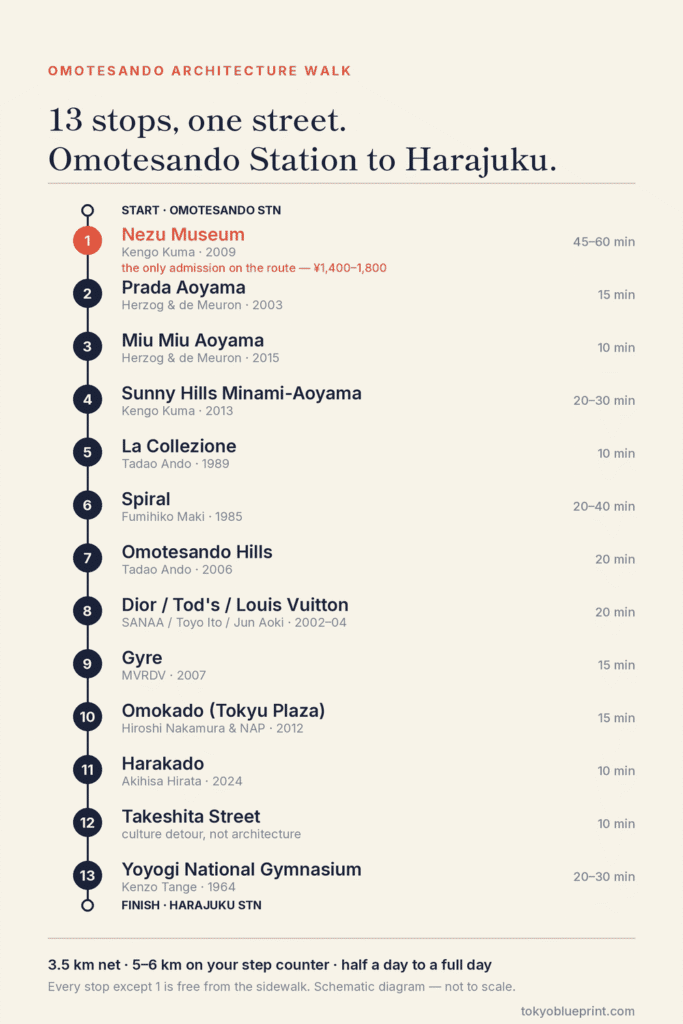
I’m Micchi. I work in property development in Tokyo, and this is the route I send friends on when they want to understand what Japanese and international architects have been doing to this city since the 1960s. It runs from Omotesando Station to Harajuku Station, covers 12 buildings plus one essential culture detour, and takes anywhere from a half day to a full day depending on how many coffee breaks you allow yourself (I’d allow several).
Before You Go
- Best time to start: a weekday morning. Omotesando’s sidewalks get crowded fast, especially near the brand flagships, and you’ll want space to actually look up at the facades.
- Cost: every building on this list can be appreciated from outside for free. The Nezu Museum’s garden and galleries are the only paid admission on the route — plan on ¥1,400–¥1,800 depending on the exhibition, with timed online tickets slightly cheaper than the door price. It opens 10:00–17:00 (last entry 16:30) and closes Mondays and between exhibitions, so check the calendar before building your day around it.
- Footwear: comfortable shoes. You’ll cover 3.5 km net, but with backtracking for photos and detours, expect more like 5–6 km.
- Connectivity: you’ll want maps running the whole way, especially for the smaller side-street stops like La Collezione.
The Route
1. Nezu Museum — Kengo Kuma, 2009
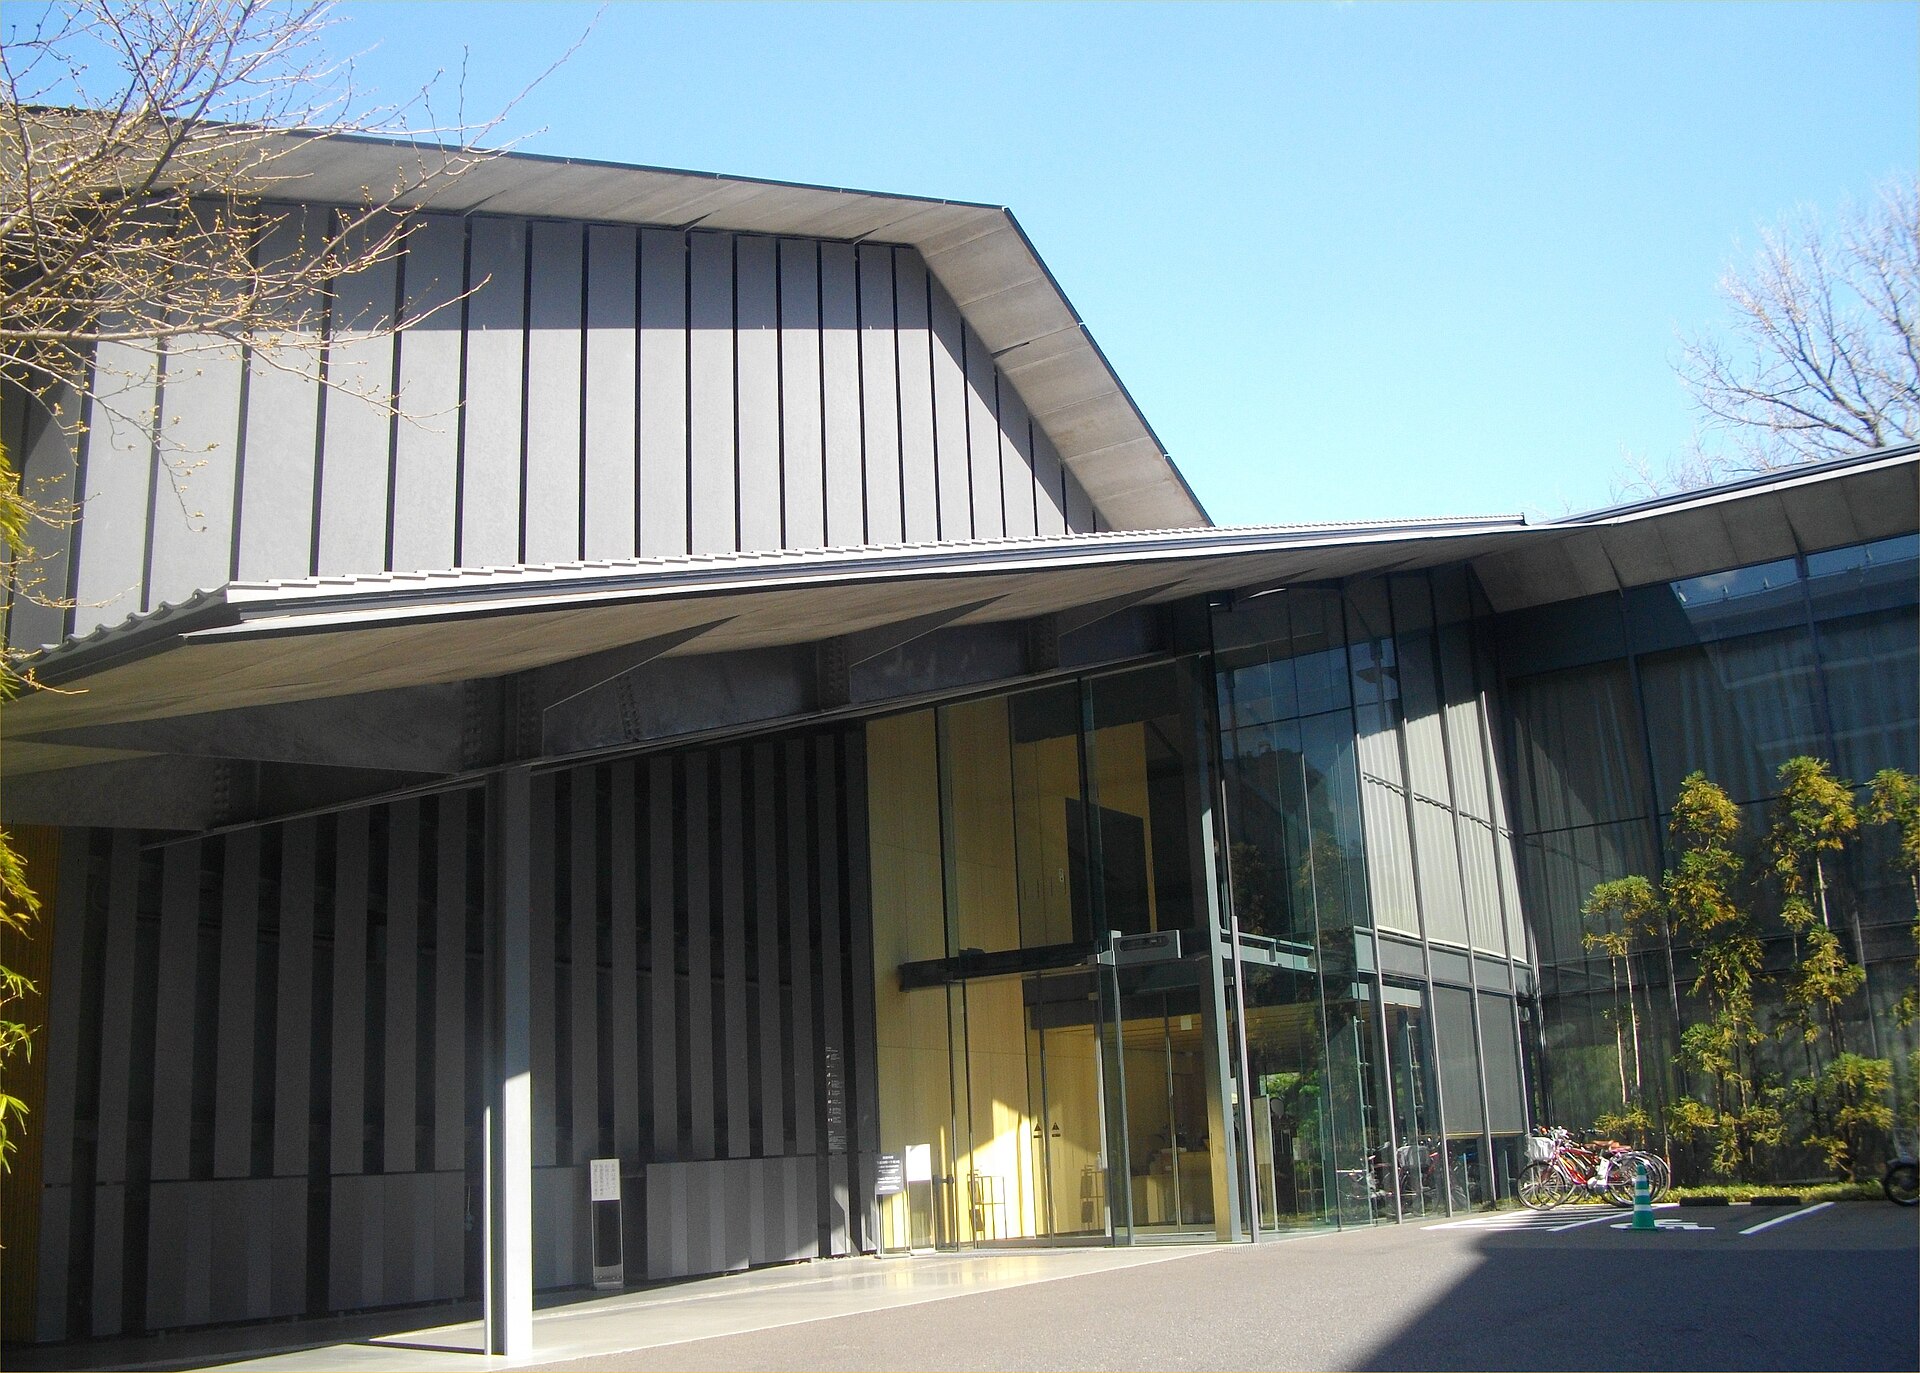
Start here, at opening time, before the crowds build. Kuma’s approach path is the whole point: a narrow, bamboo-lined corridor that bends slightly so you can’t see the museum entrance from the street. It’s a deliberate delay tactic, a way of making you shed the noise of Omotesando’s main avenue before you arrive. Easy to walk past: the roof’s deep eaves, which echo traditional temple rooflines without literally copying them — look at how the eave edge is a thin, sharp line rather than a heavy beam. Practical tip: the museum’s garden, with its teahouses and ponds, is worth the ticket price on its own, and it’s the calmest 30 minutes you’ll spend all day. Go early, then let the walk get louder from here.
Every time I visit, I end up staring at how the roof resolves at its edges — the joinery and detailing are so quietly precise that I lose track of time before I’ve even reached the ticket desk.
2. Prada Aoyama — Herzog & de Meuron, 2003
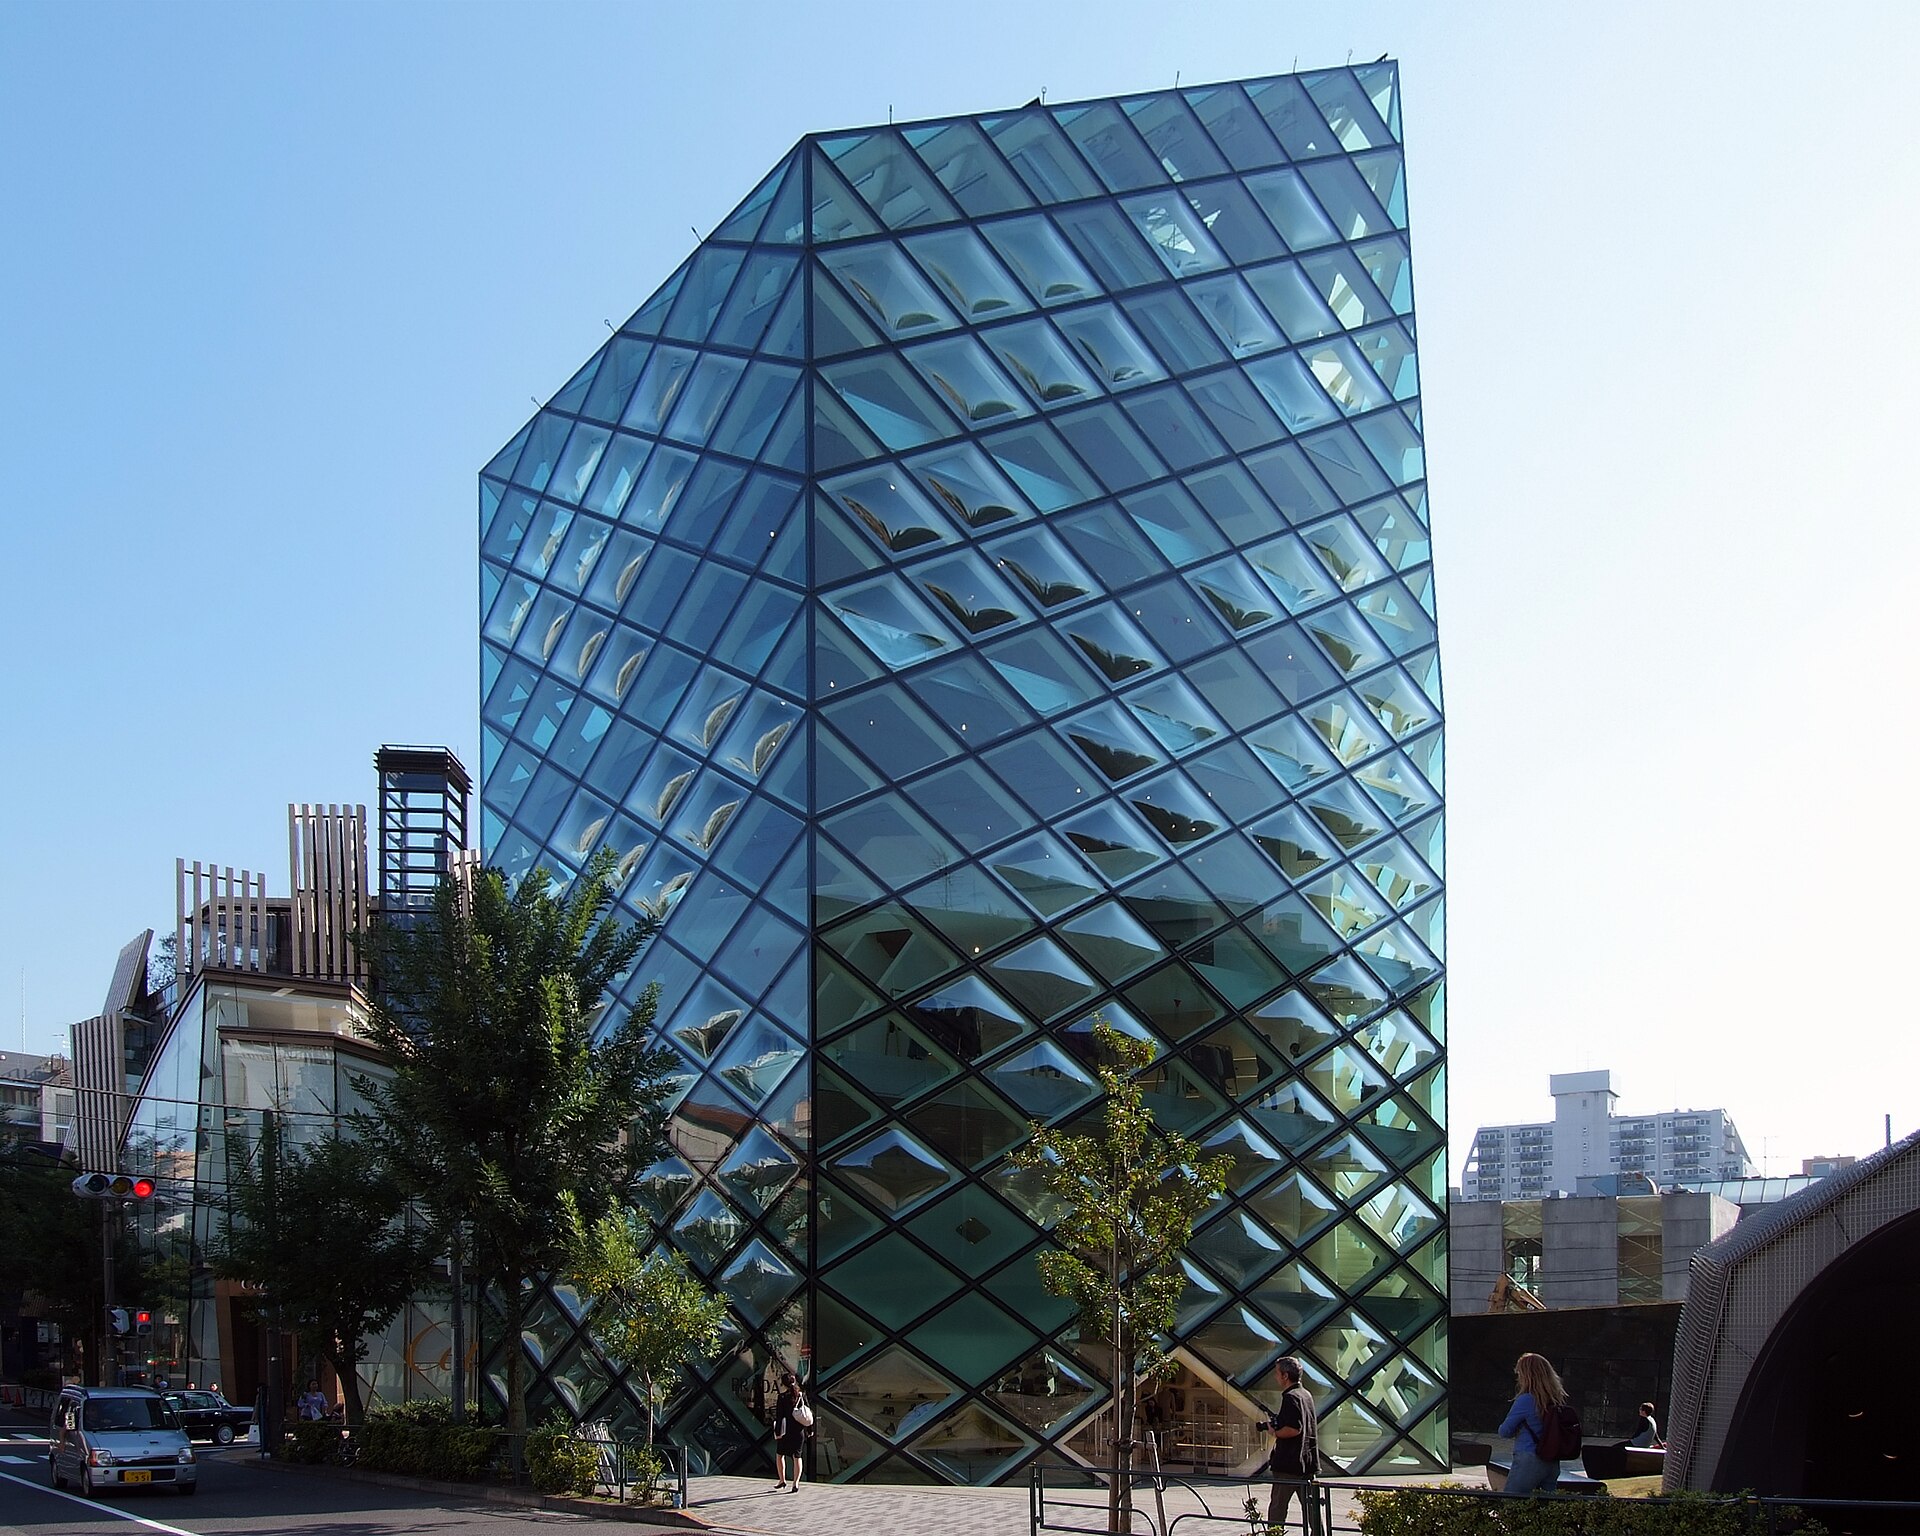
Walk north and the facade will announce itself before the building does: a diamond-grid structure wrapped in glass panels that are alternately convex, concave, or flat. This isn’t decoration — the grid is also the building’s structural skeleton, meaning the “wallpaper pattern” you’re looking at is literally what’s holding the building up. What to look for: stand at a corner and watch how the curved panels distort reflections of the street differently than the flat ones do, turning the whole facade into a soft-focus mirror. Practical tip: the building reads best in late-morning light, when the glass isn’t washed out by direct glare. Circle the whole footprint once — the geometry shifts more than you’d expect from any single angle.
And yes — go inside. I’ll admit it took me real courage the first time to walk into a luxury flagship with zero intention of buying anything, but the interior is part of the architecture, and nobody will blink. Architects do this constantly. Consider it field research.
3. Miu Miu Aoyama — Herzog & de Meuron, 2015
Cross the street and you’ll find the same architects’ answer to their own building, a decade later. Where Prada is transparent and porous, Miu Miu is a closed box, wrapped in perforated copper-alloy panels that give almost nothing away. Easy to walk past: this closure is the point, not a compromise — Herzog & de Meuron treated it as a deliberate counter-statement to Prada’s openness, two moods for two sister brands facing each other across the same intersection. Practical tip: photograph the two buildings together from the crosswalk island if traffic allows — the contrast is the whole story here, and neither building makes full sense without the other in frame.
4. Sunny Hills Minami-Aoyama — Kengo Kuma, 2013
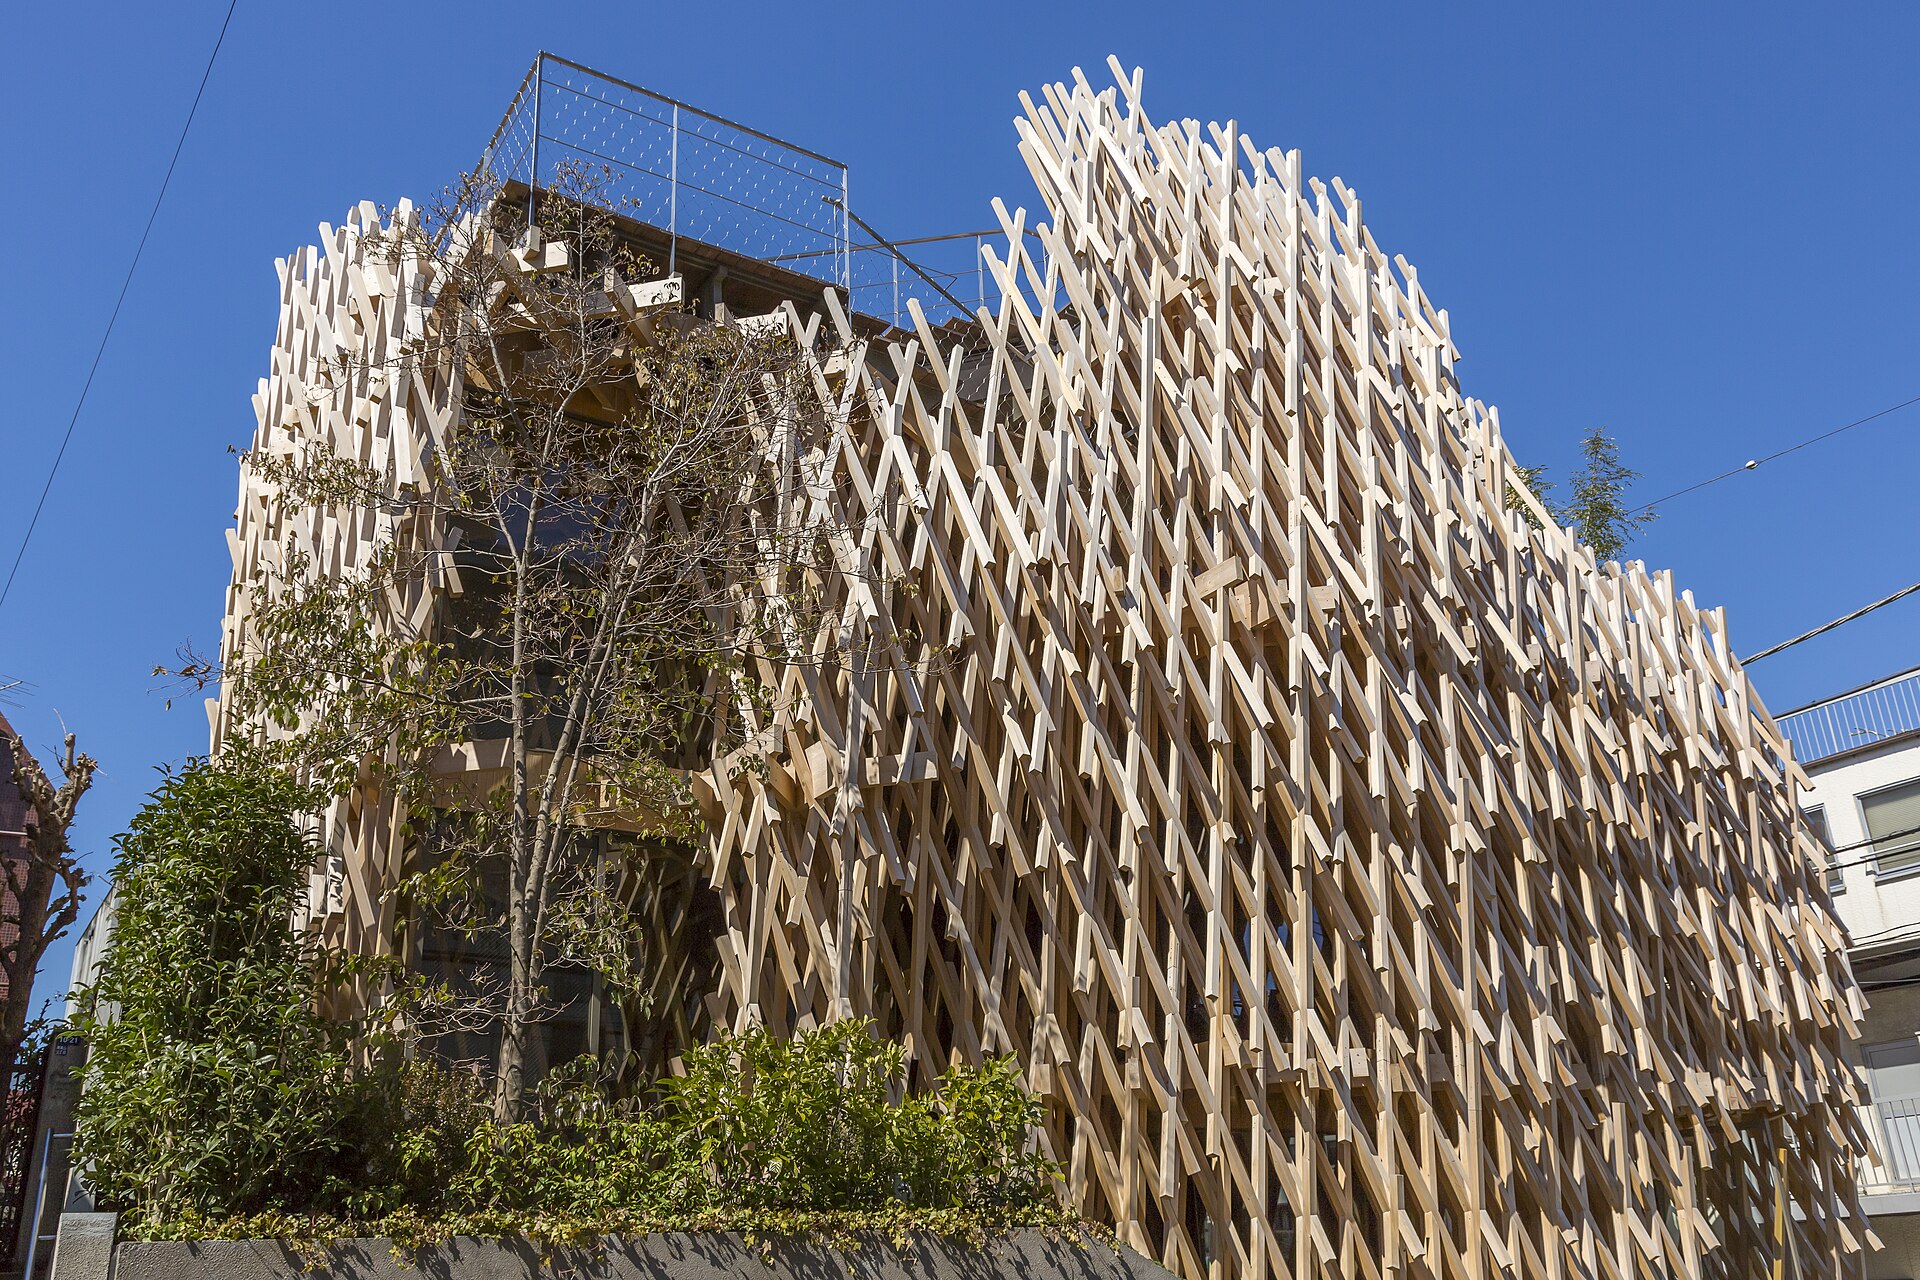
A short detour off the main avenue brings you to one of Kuma’s most delicate structures: a lattice shell built from thin timber strips, joined using jigoku-gumi (“hell joinery”), a traditional technique that locks pieces together without nails or metal fasteners. What to look for: the way the lattice reads as almost basket-woven from a distance but resolves into precise, repeated joints up close — it’s worth walking right up to the facade to see how the timber pieces actually interlock. Practical tip: this is a pineapple cake shop as much as a building (open 11:00–19:00), and the shop has long welcomed visitors with a complimentary slice and tea — though it’s a courtesy rather than an advertised policy, so treat it as a pleasant surprise if it happens. Either way, it’s a good excuse to sit down before the next stretch.
A detail I love about this place: I’ve heard that one of the architects who worked on this building at Kuma’s office later moved over to help run the shop itself. The person handing you tea may understand the timber joints above your head better than anyone.
5. La Collezione — Tadao Ando, 1989
This one is easy to walk straight past, which is exactly why it’s on the list. Tucked back from the street, it’s an early Ando building — poured-concrete geometry, sunken courtyards, and the architect’s signature play of light through narrow slots rather than large windows. Easy to walk past: the way the building recedes below street level, so you’re looking down into courtyards rather than up at a facade, a very different relationship to the street than the brand flagships nearby. Practical tip: slow down here on purpose. Nothing announces this building the way Prada or Miu Miu do, so give yourself a minute to actually find the entry sequence before moving on.
6. Spiral — Fumihiko Maki, 1985
Maki’s Spiral building is one of the quieter icons on this route, and one of the most rewarding to actually walk into. The name comes from an interior ramp that spirals up through the atrium, connecting gallery, shop, and café levels without conventional stairs. What to look for: stand at the ground floor and look up along the ramp’s curve — it’s a study in how a circulation route (the path you walk to get somewhere) can also be the building’s main event, rather than just a hallway. Practical tip: Spiral Café, on the ground floor beside the atrium, is a solid lunch stop (open daily 11:00–21:00, serving straight through from lunch to dinner).
If you’re lucky, you’ll catch a professional pianist playing in the atrium — the space was designed for exactly this kind of overlap between art and daily life, and hearing live music drift up the ramp is the building working as intended.
7. Omotesando Hills — Tadao Ando, 2006
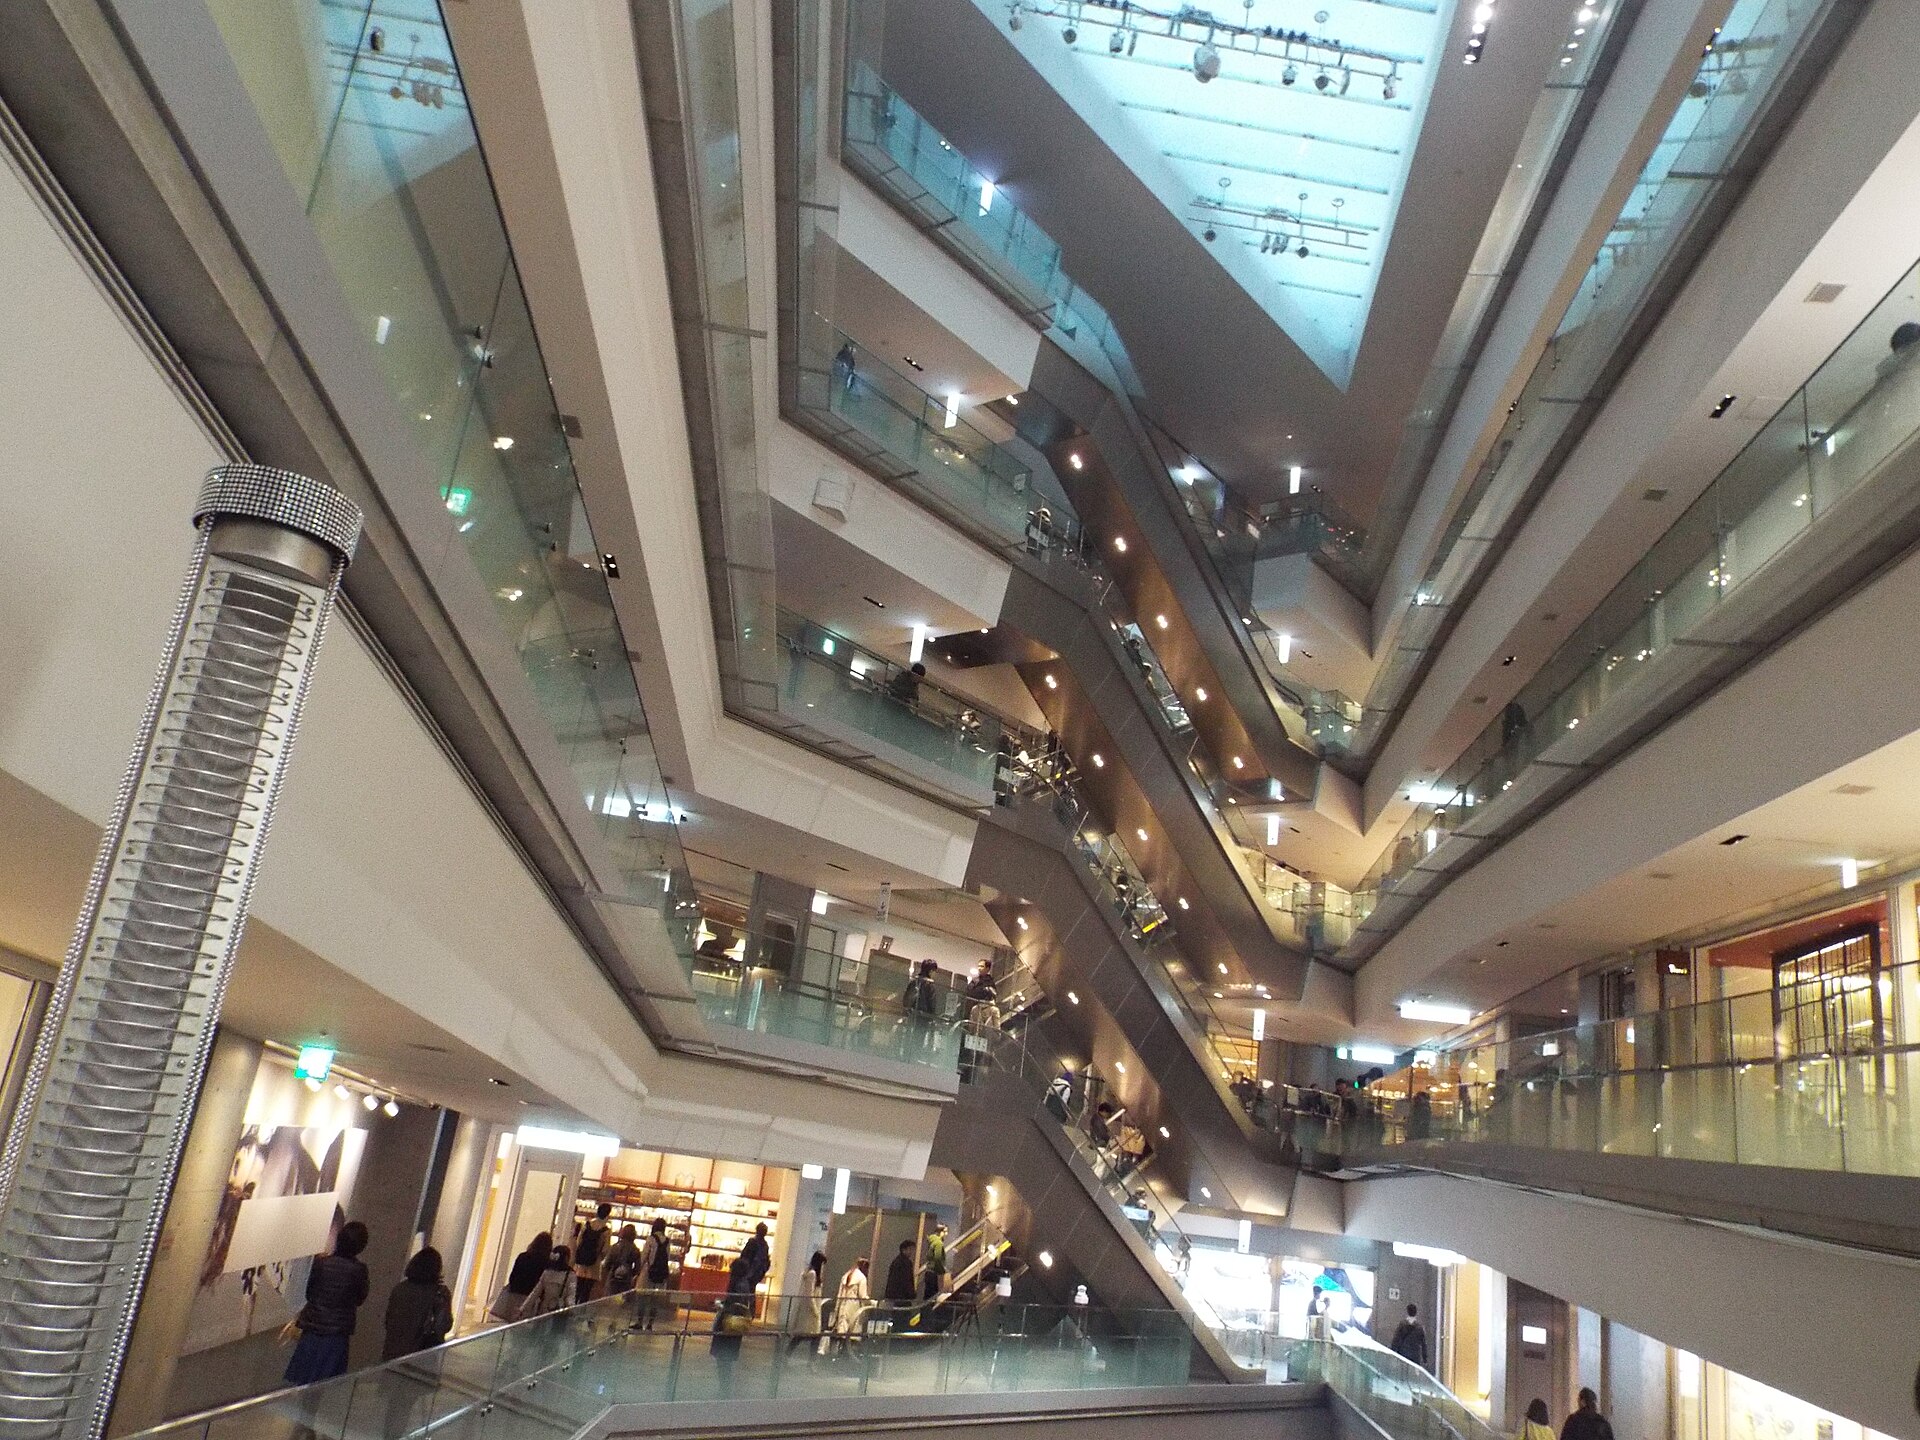
Ando again, but at a completely different scale. From outside, the building is deliberately low — Ando kept it under the height of the zelkova trees lining Omotesando, so it doesn’t compete with the street’s tree canopy. Easy to walk past entirely: step inside and the interior spiral ramp, which winds around a long central void, is built at the exact same gentle slope as the sidewalk grade outside. Ando essentially folded the street itself down into the building. Practical tip: ride the ramp all the way to the top and back down once — it’s free, air-conditioned, and gives you the best sense of the building’s real scale, which the modest street facade hides.
Allow me one aside from the day job: this site once held the historic Dōjunkai Aoyama Apartments (1927), and the street enforces a height limit to protect the zelkova canopy. Rebuild something historic, secure enough floor area, stay under the trees — run those constraints together and this long, low, half-buried form is close to the optimal answer. Once I saw it as a solved equation rather than a shopping mall, I couldn’t unsee it.
8. The Flagship Crossing: Dior, Tod’s, and Louis Vuitton
A few minutes on, three flagship stores by three different architects sit close enough together to treat as one stop.
Dior Omotesando — SANAA, 2003. The facade is built from layered, translucent white screens set behind glass, so the building seems to glow rather than reflect. Look for how the layering shifts the facade’s apparent depth as you walk past — it reads almost like fabric rather than a fixed material.
Tod’s Omotesando — Toyo Ito, 2004. The concrete facade is cast with angular braces that trace the silhouettes of the zelkova trees on the street outside, structure and ornament merged into one pattern. What to look for: the braces also double as the building’s actual structural frame, so the “tree” motif isn’t applied decoration — it’s load-bearing.
Louis Vuitton Omotesando — Jun Aoki, 2002. The facade reads as a stack of trunk-like volumes — a nod to the brand’s origins as a maker of travel trunks, rendered as literal architectural massing rather than a printed logo.
Practical tip: this stretch is the most crowded on the whole route, so budget extra time for photos and don’t expect empty sidewalks.
9. Gyre — MVRDV, 2007
Gyre is easy to spot from a distance: a stack of boxy volumes that appear to twist against each other as they rise, rather than stacking straight up. What to look for: walk the perimeter and watch how the twisting creates small setbacks and overhangs at different levels — those aren’t just visual flourish, they generate outdoor terrace space on upper floors that a straight stack wouldn’t have. Practical tip: the stepped terraces you see from the street belong to the building’s shops and restaurants rather than a freely accessible roof deck — so enjoy the geometry from the sidewalk, and save your elevated view over Omotesando’s tree line for the free rooftop garden two stops ahead.
10. Omokado (Tokyu Plaza Omotesando Harajuku) — Hiroshi Nakamura & NAP, 2012
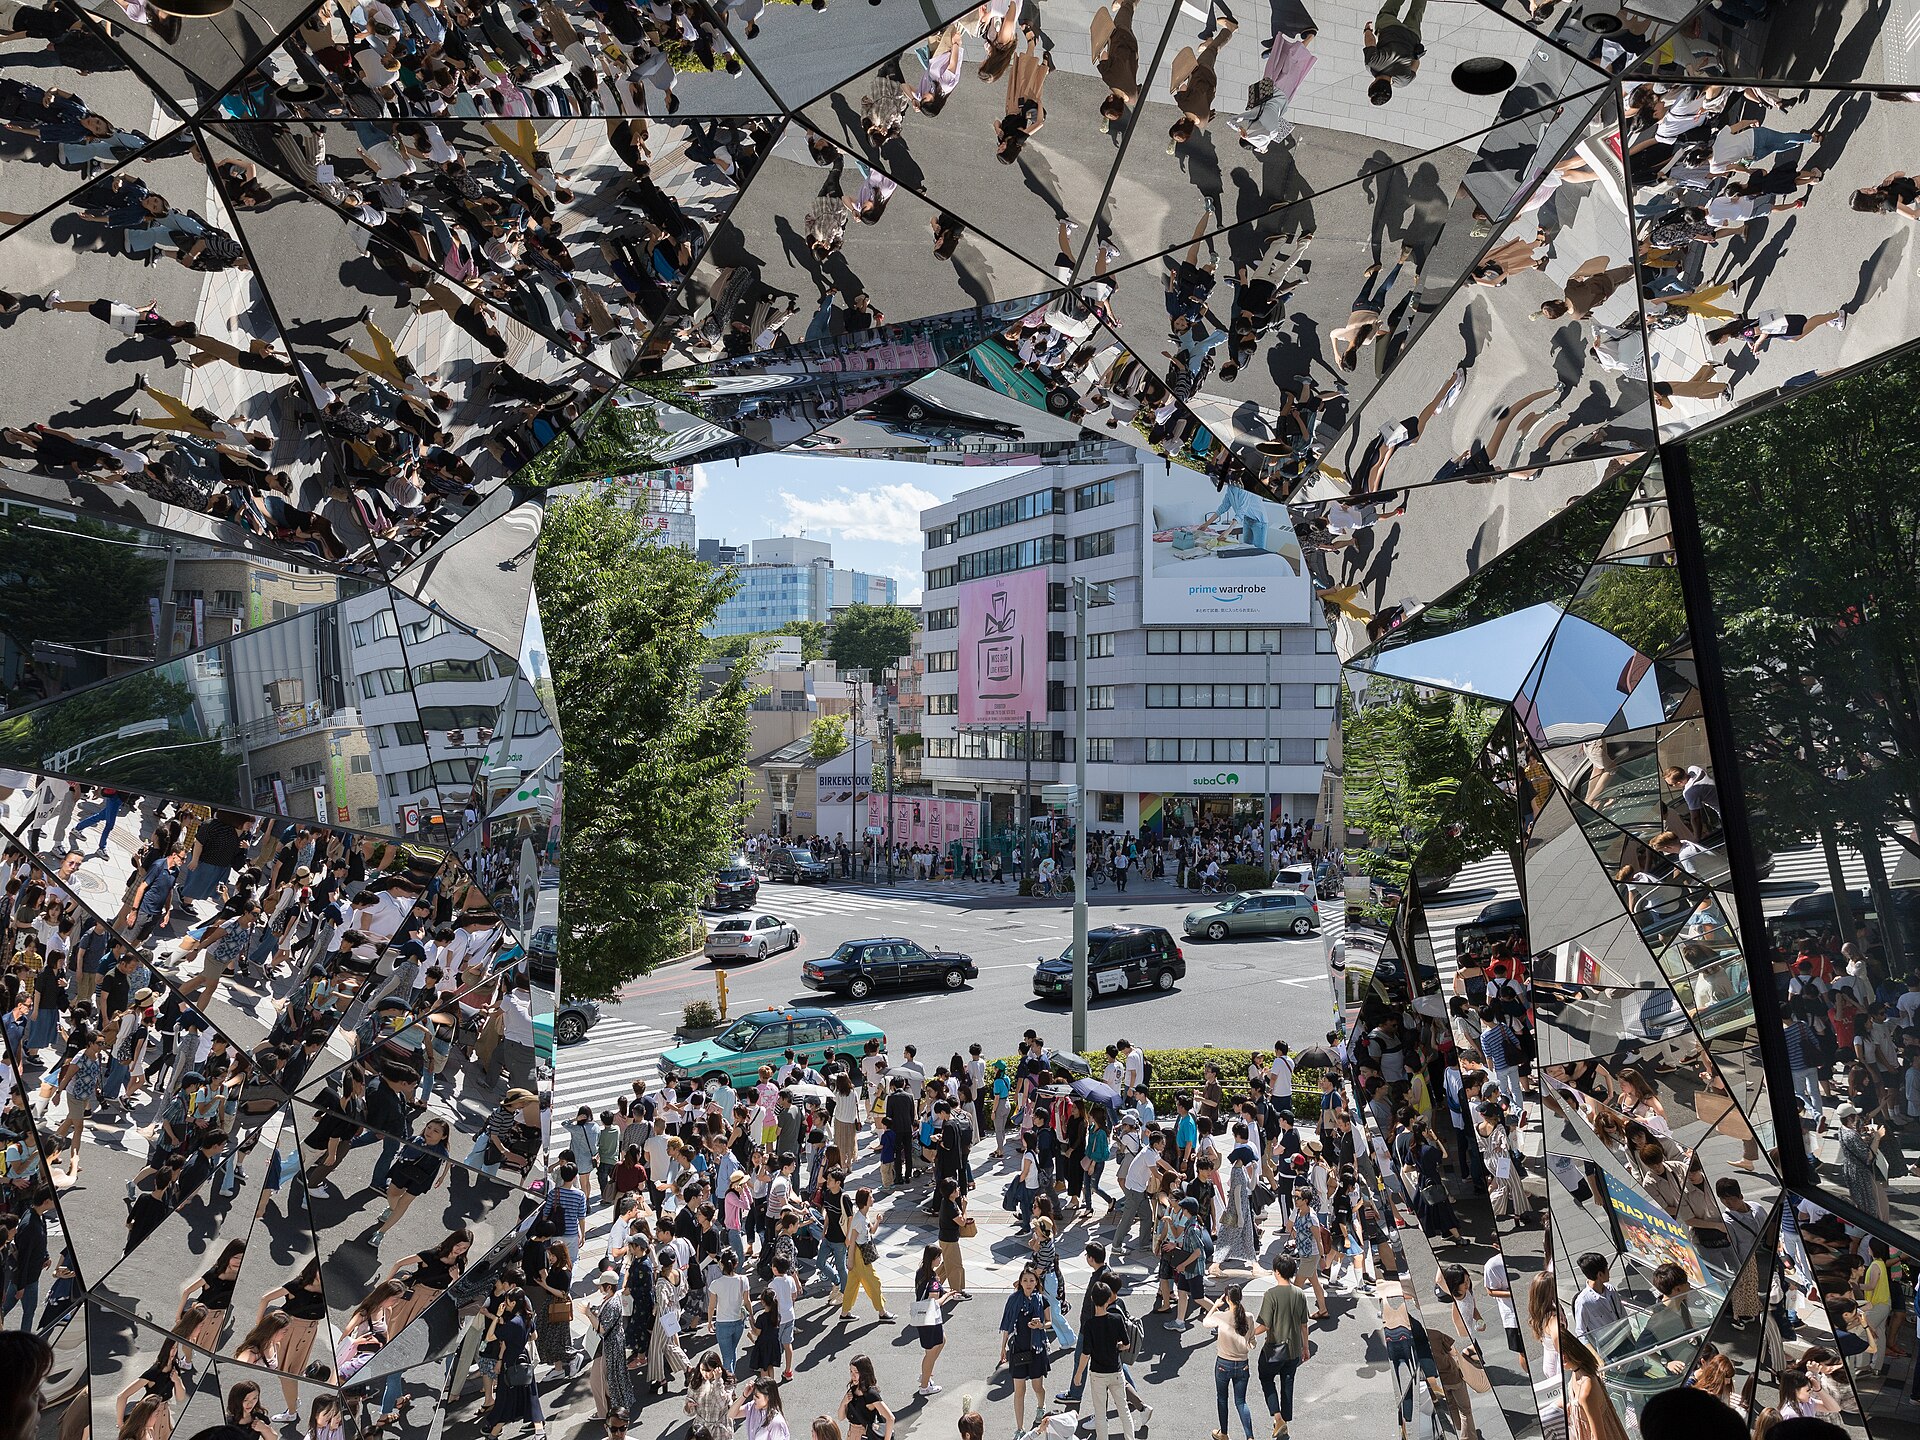
At the Harajuku end of the crossing, the entrance itself is the architecture: a kaleidoscopic escalator lined floor-to-ceiling in angled mirrors, so riding up feels like ascending through a faceted crystal rather than a shopping mall lobby. What to look for: the mirror angles are irregular on purpose, breaking up your reflection into fragments instead of a single clean image — a very different idea of “entrance” than a typical glass storefront. Practical tip: the rooftop garden above the shops, Omohara no Mori, is open daily 8:30–22:30 with no ticket required, and it’s a good place to sit and look back across the intersection (note that only food and drink bought inside the building can be brought up); the escalator itself photographs best looking straight up.
11. Harakado — Akihisa Hirata, 2024
Directly across the same crossing sits Omokado’s newest neighbor, built more than a decade later. Harakado’s facade is a faceted arrangement of glass volumes with terraced greenery folded into the massing, stepping back at odd angles rather than presenting one flat front. What to look for: it’s worth reading this building explicitly against Omokado — same corner, same intersection, two very different answers, twelve years apart, to the question of how a commercial building should meet a busy street. Practical tip: stand at the crosswalk island (traffic permitting) so both buildings are in view at once; the comparison is more interesting than either building alone.
I think of these two as siblings — same developer (Tokyu), same corner, twelve years apart, completely different personalities. Once you see them that way, the pair becomes almost endearing: the older one all mirrors and spectacle, the younger one all terraces and greenery.
12. Culture Detour: Takeshita Street
This isn’t architecture, and that’s exactly why it belongs here. Duck into Takeshita Street for ten minutes of crepe stands, cotton candy the size of your head, and teenage fashion at full volume — a total sensory reset between the considered, quiet geometry of the buildings on either side of it. Practical tip: don’t try to see everything; grab a crepe, walk the length of it once, and let it be a palate cleanser rather than its own destination.
13. Finale: Yoyogi National Gymnasium — Kenzo Tange, 1964
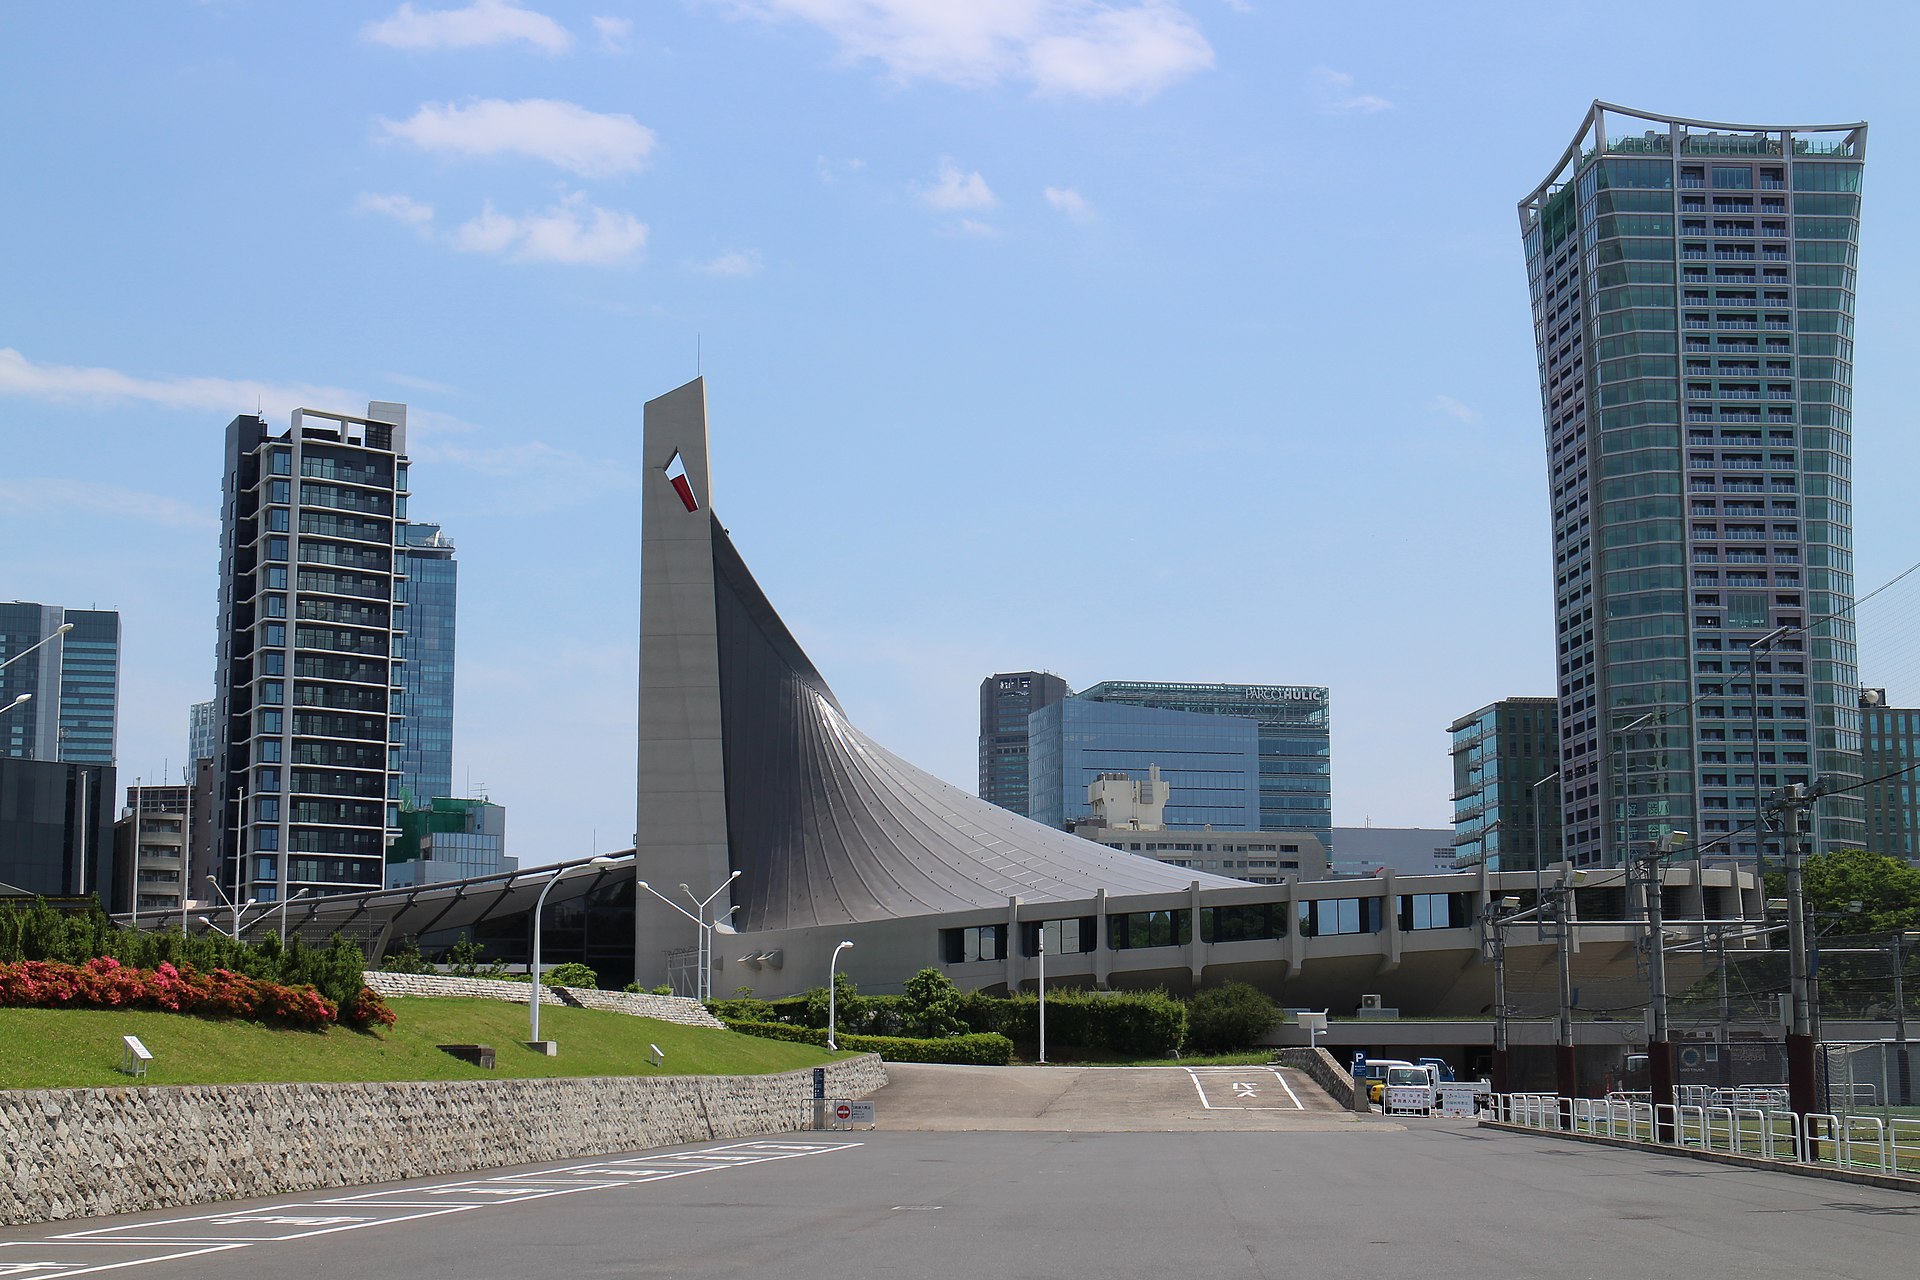
End here. Tange’s gymnasium, built for the 1964 Tokyo Olympics, is where this walk’s story about Japanese architecture actually begins — everything else on this route exists in some kind of conversation with what Tange proved was possible here. The roof is suspended from massive cables strung between two concrete pylons, a technique borrowed from suspension bridges rather than conventional roof framing, which is why the building seems to swoop rather than sit. What to look for: walk around the full perimeter if you can — the roofline reads completely differently from each side, alternately looking like a wave, a shell, and a tent. It’s visible and walkable from outside even when the interior is closed. Practical tip: come at golden hour if your timing allows; the curved concrete catches low light better than almost anything else on this list.
The Route at a Glance
| # | Stop | Architect | Year | Time Needed |
|---|---|---|---|---|
| 1 | Nezu Museum | Kengo Kuma | 2009 | 45–60 min |
| 2 | Prada Aoyama | Herzog & de Meuron | 2003 | 15 min |
| 3 | Miu Miu Aoyama | Herzog & de Meuron | 2015 | 10 min |
| 4 | Sunny Hills Minami-Aoyama | Kengo Kuma | 2013 | 20–30 min |
| 5 | La Collezione | Tadao Ando | 1989 | 10 min |
| 6 | Spiral | Fumihiko Maki | 1985 | 20–40 min (longer with lunch) |
| 7 | Omotesando Hills | Tadao Ando | 2006 | 20 min |
| 8 | Dior / Tod’s / Louis Vuitton | SANAA / Toyo Ito / Jun Aoki | 2003 / 2004 / 2002 | 20 min |
| 9 | Gyre | MVRDV | 2007 | 15 min |
| 10 | Omokado (Tokyu Plaza) | Hiroshi Nakamura & NAP | 2012 | 15 min |
| 11 | Harakado | Akihisa Hirata | 2024 | 10 min |
| 12 | Takeshita Street | — | — | 10 min |
| 13 | Yoyogi National Gymnasium | Kenzo Tange | 1964 | 20–30 min |
Practical Notes
Distance: about 3.5 km net, start to finish, not counting the small detours and backtracking for photos — expect closer to 5–6 km on your phone’s step counter by the end.
Food stops: Sunny Hills (stop 4) for pineapple cake and tea, Spiral Café (stop 6) for a proper lunch, and Takeshita Street (stop 12) for a crepe. That’s roughly breakfast-adjacent, lunch, and dessert built into the architecture itself, so you don’t need to plan food separately.
If you only have two hours: skip straight to stops 2, 7, 8, and 13 — Prada, Omotesando Hills, the flagship crossing, and Yoyogi Gymnasium. That’s the fastest version of the story: glass facade, interior ramp, three flagships in conversation, and the Olympic roof that started it all.
Rainy day note: several stops have covered or interior viewing options — Omotesando Hills’ ramp, Spiral’s atrium, and Gyre are all indoors once you’re past the entrance, so the route holds up reasonably well in wet weather. The exterior-only stops (La Collezione, the flagship crossing, Yoyogi) are the ones to rush a little.
Before You Head Further Out
If this route gives you a taste for what is happening in Tokyo architecture right now, the next chapter is Azabudai Hills — the city’s newest large-scale development, and a useful counterpoint to everything built along this older, denser stretch of Omotesando. It is an eight-stop walk of its own, and most of it is free.
If you would rather spend the afternoon inside something, the two teamLab venues are the obvious candidates, and they are not interchangeable. Here is how Borderless and Planets actually differ, and which one to book.
And if you want to sleep somewhere that belongs on a list like this one, here are ten design hotels in Tokyo under ¥30,000 a night — including a couple in Shibuya, at the far end of this route.
This post contains affiliate links. See our full disclosure.